Organising your DJI Avata 2 Drone for the primary time may be an thrilling expertise. On this tutorial, I’ll information you thru the steps to get your drone prepared for its maiden flight and share some suggestions and methods to boost each your flight and digicam picture high quality.

In case you are nonetheless on the fence about whether or not you need to get the DJI Avata 2 FPV drone, take a look at my detailed evaluate: https://oscarliang.com/dji-avata-2/
If you happen to determine to get the DJI Avata 2, I like to recommend getting the Fly Extra Combo which comes with 3 batteries:
Listed below are the helpful equipment you will get on your Avata 2: https://oscarliang.com/dji-avata-2-accessories/
Step-by-Step Setup Information for Maiden Flight
Unboxing: Unbox your DJI Avata 2 and guarantee you will have all the mandatory elements: the drone, controller, batteries, charger, propellers, and documentation.
Charging: Cost the drone’s battery utilizing the included charger. It’s additionally a good suggestion to cost the controller and any spare batteries.
Energy On: Start by powering on the DJI Goggles 3, Movement Controller, and the Avata 2 Drone. Press the ability button as soon as lets you verify battery voltage, and if you happen to press and maintain the button down once more till all inexperienced LEDs mild up, it activates the goggles.

Goggles Tutorial: The FPV Goggles will information you thru a tutorial explaining easy methods to navigate the menu and use the movement controller to manage your drone.
Activation: Earlier than your first flight, it’s essential activate the goggles (the drone and distant don’t require separate activation). Join the USB-C port of the goggles to a cellular machine, launch the DJI Fly App, and observe the prompts for activation. You may obtain the app from DJI’s official obtain web page: https://www.dji.com/uk/avata-2/downloads


Alternatively, you should utilize a pc by downloading and putting in the newest model of DJI Assistant 2 (Client Drone Sequence) from the identical hyperlink. If you happen to beforehand put in this for different DJI fashions just like the O3 or unique Avata, make sure you replace to the newest model.

Firmware Replace: The app will immediate you to replace the firmware.
Linking: Sometimes, the drone ought to already be linked to the movement controller and goggles proper out of the field, eliminating the necessity for handbook pairing.
As soon as activated and up to date—a course of that ought to take not more than 10-Quarter-hour—you’re prepared for takeoff.
Flying Avata 2 with Movement Controller
For newbies, the Movement Controller may really feel overwhelming as a result of there are such a lot of buttons. Even for skilled pilots, it takes some getting used to. Listed below are the fundamentals to get you began:

- Arm the drone: Double-press the lock button to arm the drone, motors will begin spinning.
- Disarm: Double-press the lock button once more to disarm, the motors will cease.
- Takeoff: With the drone armed, press and maintain the Lock button to provoke takeoff. The plane will ascend to about 1.2 meters and hover.
- Braking: Throughout flight, press the lock button to make the plane brake and hover in place. Press it once more to renew flying.
- Touchdown: To land, press and maintain the lock button whereas the plane is hovering. It should land routinely and shut off the motors.
- Digital camera Management: Modify the digicam angle by tilting the movement controller up or down.
- Yaw Management: Gently press the set off and tilt the distant left or proper to pan the drone.
- Lateral Motion: Use the joystick to maneuver the drone left or proper. Pushing it up or down adjusts the drone’s altitude, ascending or descending at about 1 meter per second.
- Ahead Flight: To maneuver ahead, merely press the set off all the way in which.
- Flying Up and Down: For upward or downward flight, press the set off totally and tilt the controller up or down.
Superior Flying Methods
By default, your DJI Avata 2 might be in Newbie mode, which is designed to be very gradual and secure for brand new pilots. On this mode, you possibly can’t change flight modes, which helps stop accidents when you’re nonetheless studying. Nevertheless, as soon as you’re feeling assured with the fundamentals, you’re able to take the following step.
Switching Off Newbie Mode: Go to Settings -> Management to show off Newbie mode. It will unlock the drone’s full capabilities and can help you change between totally different flying modes.
Sport Mode: By urgent the flight mode button, you possibly can activate Sport mode. Consider it as Regular mode with a major pace increase. It’s excellent for once you need a bit extra pleasure and an opportunity to actually see what your drone can do.
Turtle Mode: If you happen to’re acquainted with Betaflight, you’ll respect Turtle mode. This setting helps the Avata 2 recuperate from crashes by flipping itself right-side up. It’s extremely helpful in case your drone finally ends up the wrong way up after a mishap, saving you a visit to retrieve and manually reset it. You could find Turtle Mode within the Settings Menu.
Actual-time Stay View
By double tapping actually exhausting on the best facet of the goggles, you possibly can activate realtime dwell view of your surrounding utilizing the 2 entrance going through cameras.
By default it’s on 2D mode which solely makes use of one of many two cameras. You may set it to 3D within the Settings-> Show which makes use of each cameras and truly improves usability IMO.
Head Monitoring
Head Monitoring is an interesting function that enhances your flying expertise by linking digicam motion to your head actions. Right here’s the way it works:
To allow Head Monitoring, go to the highest menu of your Goggles. This permits the digicam gimbal to maneuver up and down as you progress your head up and down. While you look left or proper, the drone will pan in that route (because the gimbal doesn’t transfer in horizontal axis).
Initially, controlling the digicam together with your head whereas directing the drone with the movement controller may really feel a bit unnatural. Nevertheless, with some observe, you possibly can obtain dynamic and artistic photographs which can be tough to duplicate with conventional controls.
It’s vital to say that Head Monitoring solely works with the Movement Controller and isn’t supported by the Distant Controller 3.
Return to House
Maintain down the flight mode button can activate return to house (RTH) throughout flight. Throughout return to house you possibly can acquire again management by urgent the Lock button. It’s very correct, touchdown inside 1 meter of the house level.
DJI Avata 2 additionally help Low Battery RTH and Failsafe RTH.
Linking Units
Your Avata 2, distant, and goggles needs to be linked proper out of the field. Nevertheless, if it’s essential re-link them for any motive, right here’s easy methods to do it. Observe that there’s no devoted hyperlink button on the brand new units – to place them in hyperlink mode, you merely maintain the ability button for five seconds.
- Plane: With the drone powered on, press and maintain the ability button till you hear a steady beep, indicating the battery stage LEDs are blinking in sequence.
- Goggles: With the goggles powered on, press and maintain the ability button till the goggles begin to beep constantly.
- Completion: Linking is full when the beeping stops, and that the plane’s battery stage LEDs flip stable.
- Now repeat this for the distant, and the goggles.

Observe: There’s no must hyperlink the plane on to the distant as they impart by means of the goggles.
Firmware Replace
Personally I don’t rush to replace firmware – typically new firmware may include some kind of new restrictions. I all the time wait and see what the group’s suggestions is earlier than updating.
After a firmware replace, all the time restart your plane, distant controller, and goggles earlier than takeoff. This ensures all new settings take impact accurately.
Vital: Firmware updates can reset flight parameters like RTH Altitude and Most Flight Distance. Make certain to notice your most well-liked settings beforehand and reapply them post-update.
If the replace fails, restart the plane, distant controller, goggles, and both the DJI Fly app or DJI Assistant 2 (Client Drone Sequence). Then, try the replace once more.
FCC Unlock
Sadly DJI Avata 2 doesn’t help manually switching amongst FCC, CE, and SRRC. The plane will determine the nation and area the place it’s situated in line with the situation of the cellular machine and the GPS of the plane, and change between FCC, CE, and SRRC following native legal guidelines and laws.
Whereas the ham file hack doesn’t unlock extra channels because it used to within the unique Avata and Goggles 2, it does improve RF output energy, permitting the drone to function in what seems to be an FCC RF energy mode. This hack additionally unlocks the pace limitations within the EU.
Merely get the file “ham_cfg_support” and unzip it to the basis listing of the SD card and put it within the DJI Goggles 3. Obtain right here: https://drive.google.com/file/d/1ug2U_i5kdrKQQ2I17NLJBXm2tKQeNj5Q/view?usp=share_link
There are third social gathering apps that may unlock FCC mode on the Avata 2, however they aren’t free. You can even strive a free app referred to as B3YOND however unavailable on iOS and works in older Android variations.
Greatest Transmission Settings
For CE customers, channel mode is ready to Auto and can’t be modified, so you possibly can skip to the following part.
For FCC customers, the next are my beneficial transmission settings.
Channel Mode: Set to Guide to realize full management over transmission settings.
Frequency: Select between 2.4GHz or 5.8GHz. 2.4GHz for higher penetration by means of obstacles however restricted to 1 pilot at a time attributable to its slender bandwidth (just one channel accessible). It additionally interferes with 2.4GHz radio hyperlinks reminiscent of ExpressLRS, so DO NOT use 2.4GHz once you or different pilots are utilizing 2.4GHz radio hyperlinks. 5.8GHz is preferable if you happen to plan to fly with others, because it presents a lot wider bandwidth. Relying on interference, it’s possible you’ll discover one frequency presents higher sign than the opposite, if doubtful, strive each and examine bitrate.
Bandwidth: Greater bandwidth offers higher picture high quality however will increase the chance of interference with different pilots. When flying solo, you possibly can safely use 60MHz or 50MHz. When flying in teams, contemplate decreasing the bandwidth to 50MHz, 40MHz, and even 20MHz to attenuate interference.
Utilizing 5.8Ghz, you need to have 3 channels with 60MHz and 50MHz bandwidth. If you happen to solely have 1 channel accessible, you should utilize the “ham file” hack to unlock the remainder of the channels, obtain the ham file and place it within the root listing of your goggles SD card: https://oscarliang.com/dji-fpv-system-fcc-700mw/#DJI-Goggles-2-and-O3-Air-Unit
Greatest Digital camera Settings
To get probably the most out of the DJI Avata 2, I’ve discovered these digicam settings produce nice consequence for video high quality.
For finest flying expertise and don’t care a lot about recording:
- Mode: Auto
- Decision: 1080p 100FPS
- Shade: Customary
For finest cinematic footage:
- ND filter is a should, see why: https://oscarliang.com/nd-filter-fpv/
- Mode: Guide
- ISO: 100 (or as little as doable relying in your lighting), or Auto (then set Max ISO to 400 or 800 for additional flexibility)
- Decision: 4K 60FPS (Keep away from 30FPS as a result of latency is simply too unhealthy for flying)
- Shutter Pace: 1/120
- WB: Put White Steadiness on Auto first and see what the system select, then lock in with that worth, so WB is fastened throughout flight
- FOV: Vast
- Shade: D-Log M (if you happen to coloration grade), or Customary (if you happen to don’t coloration grade)
- EIS: OFF (if you happen to use Gyroflow), or Rocksteady
- Sharpness: -1 (you possibly can improve sharpness in submit)
- Noise Discount: 0 (or +1 for lowlight reduces noise at the hours of darkness space)
For stabilization, the Avata 2 presents three modes: RockSteady, HorizonSteady, and Off. RockSteady is the default setting, offering strong stabilization. You may change this within the Settings > Digital camera > EIS menu of the goggles. If you happen to want to stabilize footage post-flight, disable EIS and set the digicam to huge mode to help Gyroflow offline stabilization.
Native side ratio is 4:3, by switching to 16:9 it has the highest and backside cutoff.

Some testing on Noise Discount worth, has an impression on shadow element and lowlight.

Some comparability on sharpness worth, personally I want -1, however that’s private choice.

Video bitrates beneath totally different decision/body fee:
- 4K 60fps: 130Mbps
- 4K 50fps: 120Mbps
- 4K 30fps: 90Mbps
- 2.7K 60fps: 100Mbps
- 2.7K 50fps: 90Mbps
- 2.7K 30fps: 70Mbps
- 1080p 120fps: 80Mbps
- 1080p 100fps: 70Mbps
- 1080p 60fps: 50Mbps
- 1080p 50fps: 40Mbps
- 1080p 30fps: 25Mbps
How one can Use Distant Controller 3
The Distant Controller 3 lets you fly in full handbook mode. You must activate the RC3 first and replace its firmware through the DJI Fly App or DJI Assistant 2 earlier than utilizing it.
To hyperlink the Distant Controller 3 to your DJI Goggles 3, observe these directions:
- Goggles: With the goggles powered on, press and maintain the ability button till the goggles begin to beep constantly.
- Distant: With the distant powered on, press and maintain the ability button till it begins beeping.
- Completion: Linking is full when the beeping stops, and that the plane’s battery stage LEDs flip stable.
Observe: the Movement Controller will nonetheless work together with your drone, however you possibly can solely use one controller at a time, depends upon which one connects to the Goggles 3 first.
Assign handbook mode to the mode button: Within the Goggles Settings->Controls->Distant Controller->Button Customization, set Customized Mode to Guide Mode.

If you happen to intend to fly in handbook mode, be sure that to take away throttle stick self centering. By eradicating the again deal with rubber, you can see two screws – tighten each screws will take away throttle stick self centering. By loosening or tightening each screws barely adjusts the friction, takes a little bit of trial and error to get it proper.

You may change between Regular/Sport/Guide flight modes utilizing the mode button.

To arm and disarm the drone in Regular/Sport modes, use these stick positions.
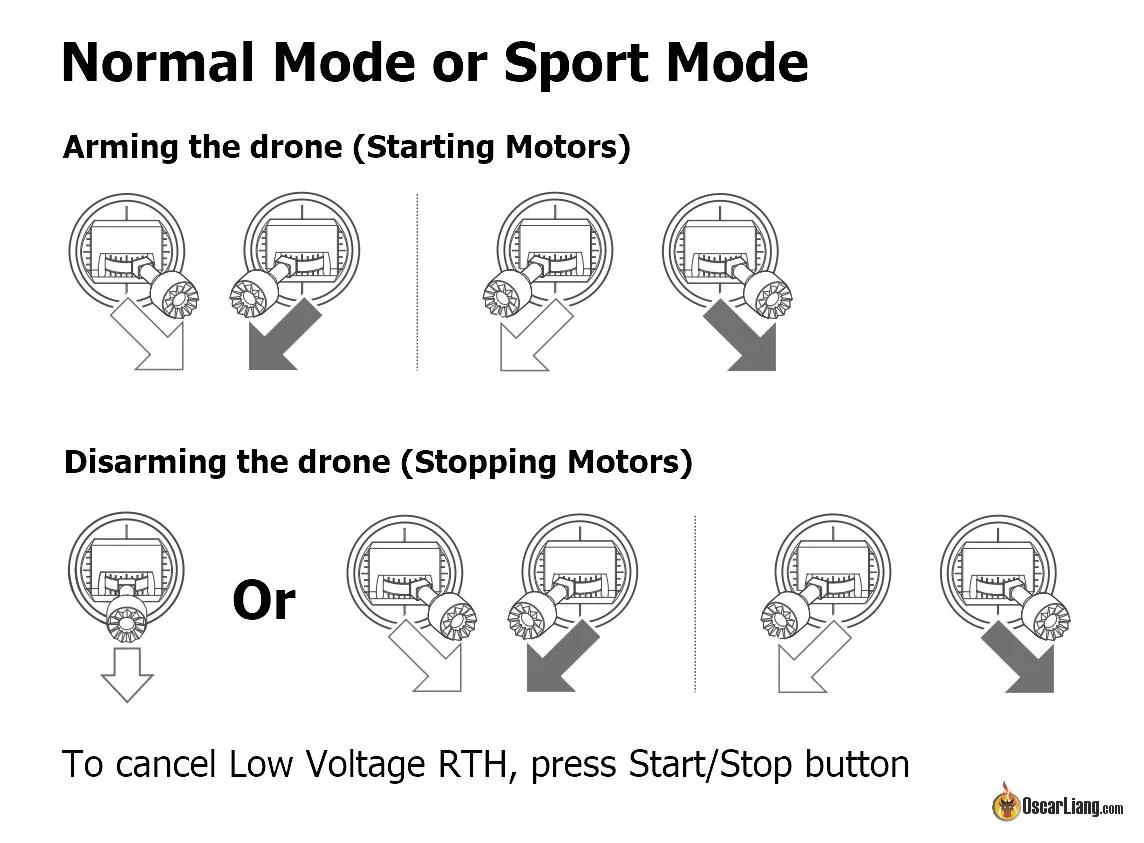
To arm and disarm the drone in Guide mode, double press the Begin/Cease button. You may modify the digicam angle utilizing the highest left rotary change.

In case of emergency, you should utilize the “Flight pause/Return to house” button in any flight mode:
- Press as soon as the quad will cease and hover in place, and put it in Regular Mode.
- Press and maintain and it’ll activate return to house; to cancel RTH, press it yet one more time.

Set your charges and expo, I’m utilizing these for freestyle flying:
- 120/800/0.5
- 120/800/0.5
- 140/650/0.5
What to Do When Dropping Sign
While you lose video, it’s possible that you simply nonetheless have RC sign. Due to this fact It’s finest to let go of the sticks; the Avata 2 ought to provoke return to house routinely.
Different Ideas and Methods
When flying over the altitude top restrict, the drone will go into Regular mode and gained’t allow you to fly any increased. You may improve the peak restrict as much as 500 meters (in Settings->Security), however you need to observe your native laws. There’s no option to take away the altitude restrict, in order that’s one other draw back in comparison with an FPV drone.
The DJI Avata 2 features a useful ‘Discover My Drone’ function. To entry it, navigate by means of the goggles menu to Settings > Security > Discover My Drone. This function reveals video footage from the 30 seconds earlier than the drone was misplaced, aiding in its restoration. The footage is saved in inner reminiscence so SD card is just not required. Moreover, if the drone nonetheless has battery energy, you possibly can activate the ESC Beeping perform beneath the identical menu to make the drone’s motors beep, serving to you find it by sound.
A helpful trick for goggle customers: place a bit of tape on the sensor between the lenses. This prevents the screens from turning off once you take away the goggles, avoiding the transient delay when turning them again on.
Battery charging: as quickly as you insert the batteries into the charging hub, it’s going to begin charging routinely. It should all the time begin with the one with highest energy stage so it finishes faster. If all of your batteries are low in energy stage, you possibly can switch the remaining cost into one single pack so you possibly can fly a bit longer – merely insert all of the batteries within the hub, press and maintain the ability button till the LED turns inexperienced. To cease, press and maintain the button once more.
To cost batteries within the area, I’ve been utilizing the Speedybee Discharger with a giant 6S 10000mah LiPo. This is sufficient to recharge 6 of the Avata 2 batteries.
File Switch
Transferring information to a telephone:
The Avata 2 facilitates file switch through Wi-Fi by means of the DJI Fly app. Merely energy on the drone, activate the QuickTransfer perform within the app, and be sure that the drone and telephone are inside 2 meters of one another with out obstructions.
Transferring information to a pc:
Join the drone to your pc utilizing a USB cable with out powering on the Avata 2, an exterior drive ought to seem. If utilizing a reminiscence card, you possibly can immediately insert the cardboard into your pc’s card reader.
Stay Feed Sharing (Video Out)
Stay feeds may be shared in 3 ways:
- Wi-Fi wi-fi sharing: Allow display screen sharing from the DJI Goggles 3 to a cell phone through Wi-Fi. Join the cellular machine to the Goggles 3 through Wi-Fi and use the DJI Fly app to view the drone’s dwell feed. This technique helps connection to just one cellular machine. The latency is over 100ms, so it’s not very best for flying utilizing this feed, however adequate for spectating. If that is too uneven, think about using a USB wired connection.
- Wired sharing: Join a cellular machine to the DJI Goggles 3 utilizing a knowledge cable and an OTG adapter. The related cellular machine will show the drone’s dwell feed through the DJI Fly app. Like Wi-Fi sharing, this technique helps just one machine. Latency is way decrease than WiFi.
- Viewers mode: Activate the published perform within the DJI Goggles 3 menu, permitting a number of goggles to obtain the dwell feed with no viewer restrict. That is very best for sharing the flying expertise with an viewers.
Observe: Needless to say you possibly can solely use one sort of connection at a time, whether or not connecting to goggles or a cellular machine.
Conclusion
By following these setup steps and suggestions, you’ll be able to seize gorgeous aerial footage together with your DJI Avata 2 Drone. Take pleasure in your flight!
Edit Historical past
- Apr 2024 – Directions written for the evaluate of the Avata 2.
- Aug 2024 – Created a separate submit for this setup information.