The Betaflight OSD (On-Display Show) is a strong function that permits you to view important flight data immediately in your FPV feed. This tutorial will information you thru the steps to arrange and configure the OSD in Betaflight, function the OSD menu, and supply helpful CLI instructions for frequent OSD factor setups.

What’s Betaflight OSD?
Betaflight OSD is a function that overlays flight information reminiscent of battery voltage, flight time, RSSI, and extra onto your FPV video feed. This function is extremely helpful for monitoring the efficiency and standing of your drone whereas flying. You’ll be able to even use it as a menu to vary your drone’s settings together with PID, charges, filters, VTX channel and extra.
This tutorial focuses on OSD for analog FPV techniques. In case you are utilizing the DJI FPV System, take a look at this tutorial on how you can set it up: https://oscarliang.com/dji-fpv-system-setup/#betaflight-osd-setup.
{Hardware} Necessities
Most Betaflight flight controllers (FC) assist OSD for analog FPV techniques, with a number of exceptions which are designed particularly for HD digital FPV techniques. This ought to be acknowledged within the FC specs.
For an FC to assist OSD in analog FPV system, it will need to have an built-in OSD chip (AT7456E). HD digital techniques don’t require this chip for OSD performance.
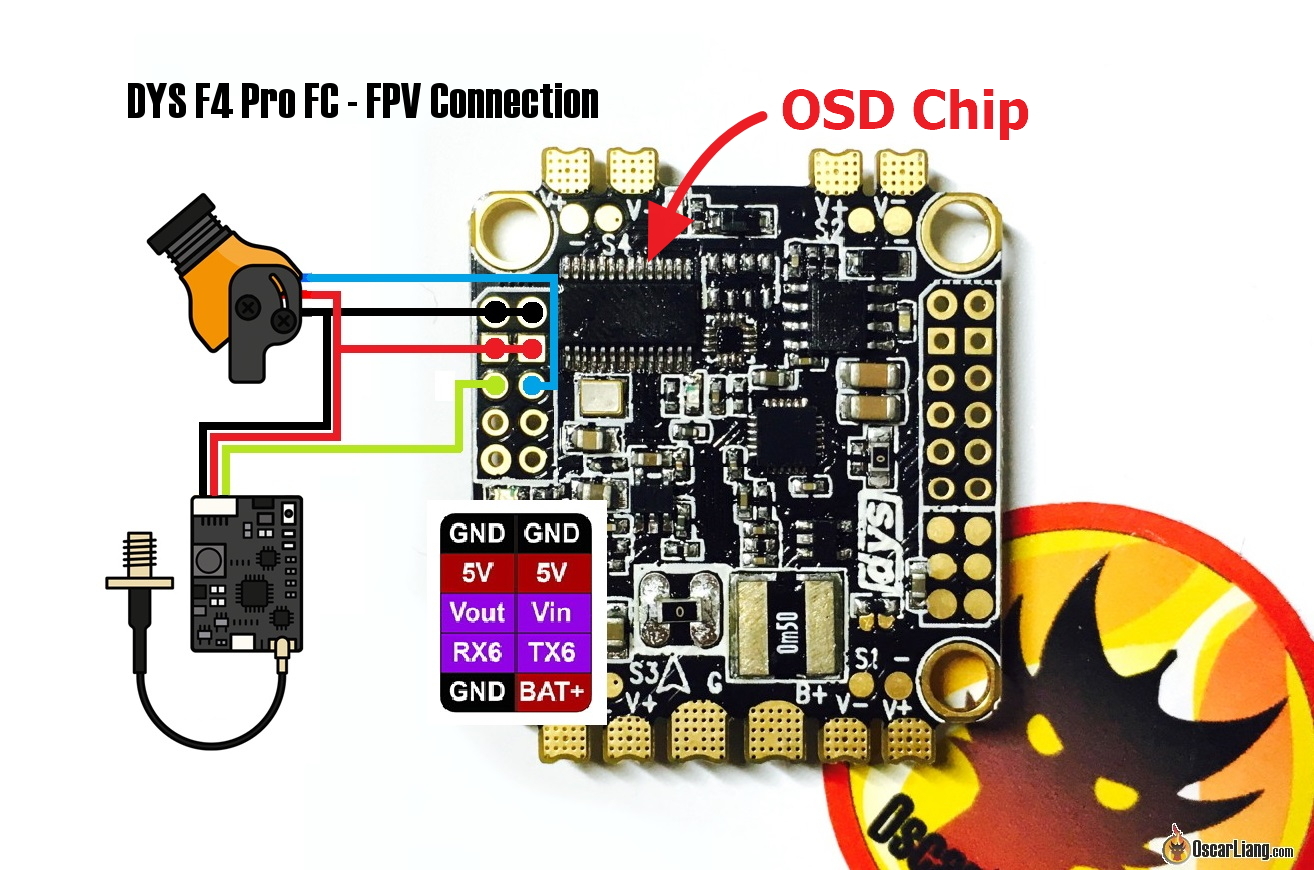
Wiring
Join your FPV digicam and video transmitter to the flight controller. The digicam sign goes to the “Vin” (video enter) pad on the FC, whereas the VTX sign connects to the “Vout” (video output) pad.
Betaflight Configurations
Enabling OSD Function
Obtain and Set up Betaflight Configurator: https://oscarliang.com/download-betaflight-configurator/. Plug your flight controller into your pc utilizing a USB cable. Open Betaflight Configurator and click on on the Join button.
Within the Betaflight Configurator, go to the Configuration tab and allow the “OSD” function. That’s it—your OSD is now activated.

OSD Tab Interface
Navigate to the OSD tab in Betaflight Configurator. That is the place you configure which parts seem in your FPV feed.
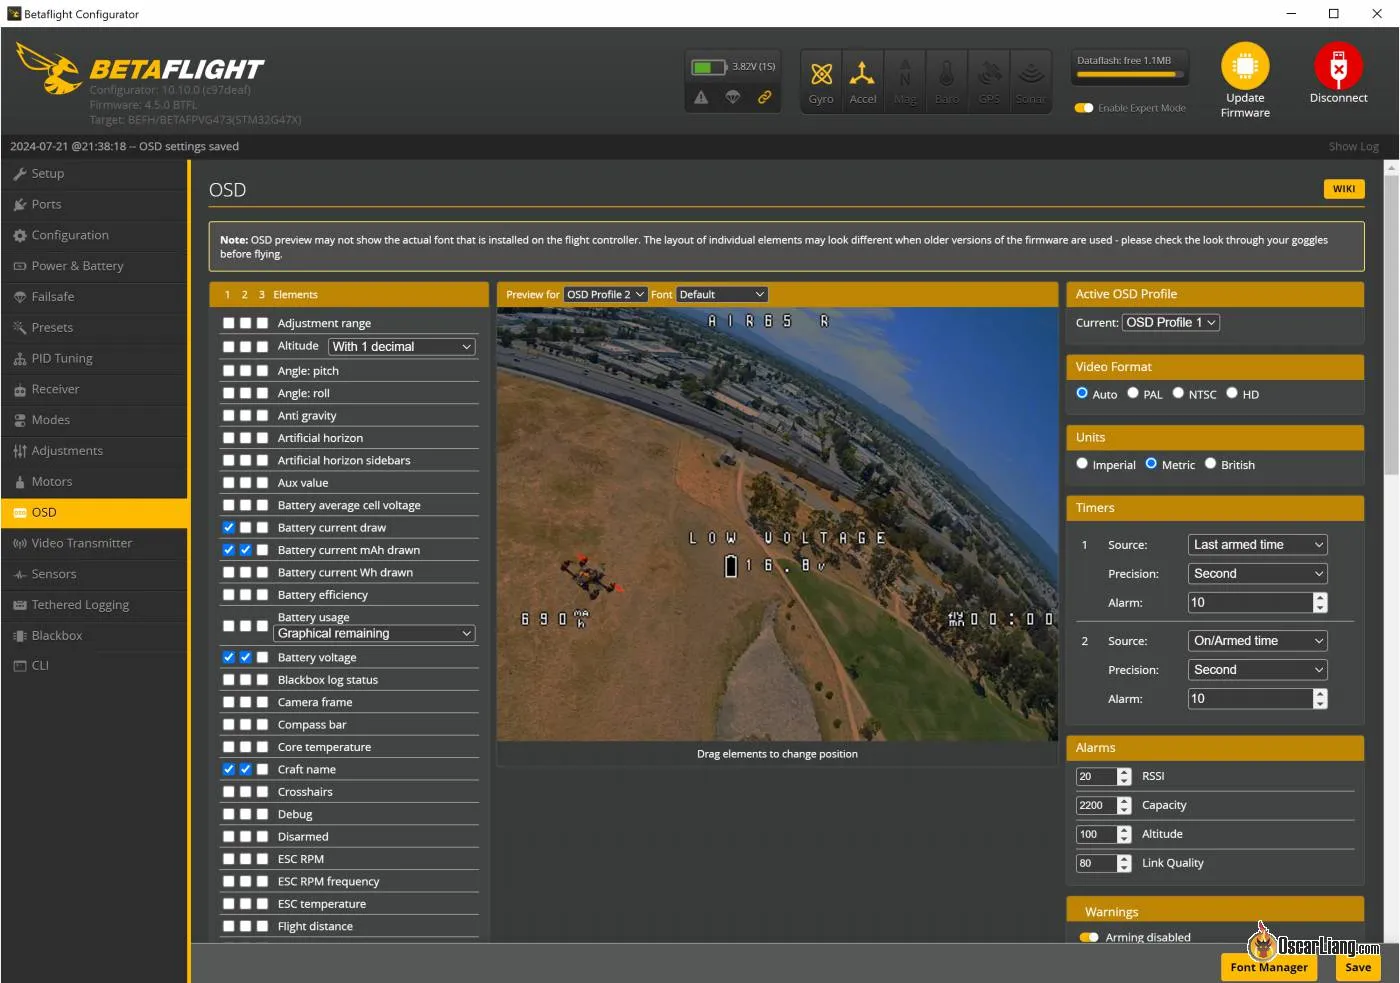
On the left, you’ll see an inventory of OSD parts. Merely activate or off the weather you need to show on the display screen.
You’ll discover three checkboxes for every factor, these correspond to the three obtainable OSD profiles you could change between throughout flight. This lets you use fully totally different OSD layouts and parts at any time by flipping a change in your radio. When you don’t want a number of OSD profiles, set “Preview for” to OSD Profile 1, and “Energetic OSD Profile” to OSD Profile 1 as nicely. Then, test the primary field for the factor you need to show.
Configuring OSD Components
Click on on a component from the left-hand menu so as to add it to the preview display screen, then drag it to your required location.

My incessantly used parts embrace:
- Battery Voltage: Shows the battery voltage, so you already know when to land and keep away from over-discharging your LiPo.
- Battery Common Cell Voltage: Routinely calculates the voltage per cell, simplifying monitoring (e.g., 16.0V for a 4S battery will show as 4.0V).
- Timer2: That is your flight time, it shows how lengthy the drone has been armed. That is totally different from “Timer1,” which exhibits powered-on time.
- Warning: Vital. Shows messages if something is mistaken with the quad, aiding in troubleshooting.
- Battery Present Draw: Reveals amp attract actual time. It requires a present sensor.
- Battery Present mAh Drawn: Reveals how a lot battery has been consumed. It requires a present sensor.
- Hyperlink High quality
- RSSI dBm Worth: Preferable over RSSI which is a proportion worth.
- Throttle Place
- VTX Channel: Helpful for confirming the channel in use.
Ideas for OSD Placement:
- Keep away from Muddle: Strive to not overcrowd your display screen with an excessive amount of data. Deal with the necessities to maintain your FPV feed clear and readable.
- Use Logical Placement: Place your important OSD parts in areas the place they’re simply readable with out obstructing your view.
OSD Settings
On the fitting facet of the OSD tab, you’ll discover numerous OSD-related choices, most of which may be left at default. Nonetheless, listed below are some key settings to contemplate:
- Video Format: Select Auto, PAL, NTSC, or HD relying in your digicam/FPV system. For analog, I like to recommend setting it to “Auto” so it detects the right video format for you. For DJI, Walksnail and HDZero, set this to HD.
- Alarms: Set limits for RSSI, battery capability, flight time, and altitude. When these limits are reached, the info will flash on-screen as a warning.
Working the OSD Menu
Betaflight OSD not solely shows flight data but additionally permits you to entry a configuration menu immediately out of your goggles. This menu helps you to alter numerous settings of the drone with out connecting to a pc, together with PID settings, charges, VTX energy/channel, and extra. This function is useful for fine-tuning your quadcopter within the subject. Word that not all choices in Betaflight Configurator can be found within the OSD menu, so that you would possibly nonetheless want your pc or an Android app for full configuration.
To entry the OSD menu, disarm your drone and use your transmitter sticks (mode 2):
- Throttle heart
- Yaw left
- Pitch ahead
Your throttle ought to stay at round heart throughout menu navigation.
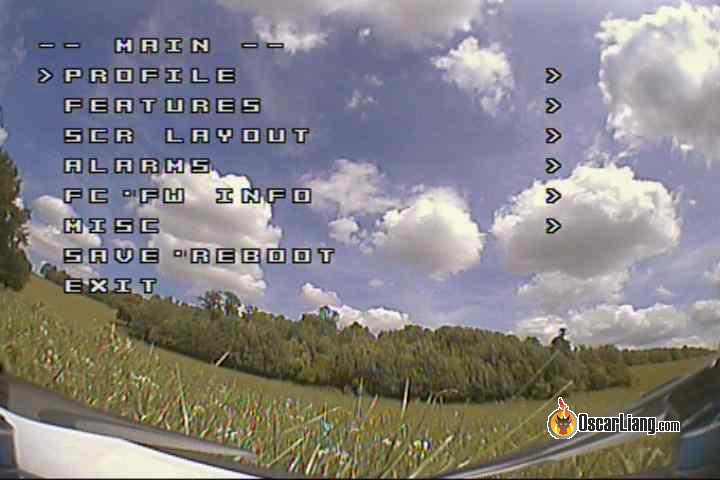
Navigating the OSD Menu:
- Pitch Up/Down: Transfer up and down the menu objects.
- Roll Proper: Enter a menu merchandise.
- Roll Left: Return or exit.
- Roll: Change parameter values.
- Yaw Proper: Rapidly save and exit.
- Yaw Left: Return to the final menu.
After making changes, save your settings by going again to the primary menu and deciding on “Save & Reboot.”


Altering Betaflight OSD Font
You’ll be able to change the OSD font by clicking the “Font Supervisor” button positioned on the backside proper of the OSD tab. Choose a font preset (I like to recommend “Daring”) and click on “Add Font.”
On this window, you may also add a customized brand, which is able to seem once you plug within the battery.
![]()
Remember that when you’ve uploaded a brand new font, it gained’t present within the preview window, however it can show accurately in your goggles.
FAQ and Ideas
- Q: I’m getting a core temperature warning. Ought to I be involved?
- A: This could occur when the drone is sitting on the bench for too lengthy with out correct cooling. It’s often a non-issue, and you may disable this warning within the OSD tab below “Warnings”.
- Q: I’m getting an RSSI warning. Ought to I be involved?
- A: Make sure you’ve set the right RSSI alarm worth. By default, it’s set to -60 which is simply too excessive for ExpressLRS. Regulate it to match your system’s sensitivity limits. For instance, for ExpressLRS 250Hz, the sensitivity restrict is -108dBm, so I usually set the warning to be round -93dBm (-15dBm hyperlink margin). You’ll be able to set this in CLI:
set osd_rssi_dbm_alarm = -93. Extra information right here: https://oscarliang.com/lq-rssi/#What-is-RSSI
- A: Make sure you’ve set the right RSSI alarm worth. By default, it’s set to -60 which is simply too excessive for ExpressLRS. Regulate it to match your system’s sensitivity limits. For instance, for ExpressLRS 250Hz, the sensitivity restrict is -108dBm, so I usually set the warning to be round -93dBm (-15dBm hyperlink margin). You’ll be able to set this in CLI:
- Q: I’m not getting OSD textual content on the display screen. Why?
- A: When you can see the Betaflight brand when energy on, that means your OSD is working, make sure you’ve chosen OSD parts and are utilizing the right OSD profile. If there’s no Betaflight brand at startup, test your video format (NTSC/PAL), set it to Auto if unsure. Additionally test your digicam and VTX wiring. Or else it could possibly be a defective OSD chip on the FC.
- Q: How do I alter the craft title within the OSD?
- A: The craft title enter subject is positioned within the Configuration tab.
- Q: I’m seeing loads of “V” letters on the display screen.
- Q: The OSD doesn’t save the font and different OSD settings.
- A: Strive plugging in your battery whereas making modifications in Betaflight Configurator to make sure the OSD chip is absolutely powered. Warning: ensure to take away the props first for security.
- Q: “Add Font” isn’t responding.
- A: Strive plugging within the battery earlier than connecting the USB to Betaflight Configurator, then attempt once more.
My OSD Setup CLI Instructions
Configuring OSD parts from scratch for each quad you construct may be time-consuming. To make issues simpler, I’ve compiled a few of my most well-liked OSD parts/format configurations you could simply copy and paste into the CLI.
Analog (with out GPS)

set osd_vbat_pos = 6465set osd_link_quality_pos = 2112set osd_rssi_dbm_pos = 2080set osd_tim_2_pos = 6520set osd_throttle_pos = 2298set osd_vtx_channel_pos = 2101set osd_current_pos = 2327set osd_mah_drawn_pos = 6496set osd_craft_name_pos = 6155set osd_warnings_pos = 6410set osd_avg_cell_voltage_pos = 2348save
Analog (with GPS)

set osd_vbat_pos = 2371set osd_link_quality_pos = 2179set osd_rssi_dbm_pos = 2147set osd_tim_2_pos = 2467set osd_flymode_pos = 2456set osd_throttle_pos = 2391set osd_current_pos = 2421set osd_mah_drawn_pos = 2404set osd_gps_speed_pos = 2359set osd_gps_lon_pos = 2065set osd_gps_lat_pos = 2048set osd_gps_sats_pos = 2115set osd_home_dir_pos = 2190set osd_home_dist_pos = 2156set osd_flight_dist_pos = 2435set osd_altitude_pos = 18508set osd_warnings_pos = 14601set osd_avg_cell_voltage_pos = 2339save
Analog (Tiny Whoop)

set osd_vbat_pos = 6444set osd_link_quality_pos = 2112set osd_rssi_dbm_pos = 2080set osd_tim_2_pos = 6520set osd_throttle_pos = 2298set osd_vtx_channel_pos = 2101set osd_current_pos = 2327set osd_mah_drawn_pos = 6496set osd_craft_name_pos = 6155set osd_warnings_pos = 6410save
Minimalist Setup
For many who want a clear and uncluttered view, the minimalist setup focuses on displaying solely the necessities:
set osd_vbat_pos = 2433set osd_rssi_dbm_pos = 2150set osd_tim_2_pos = 6520save
HD (with GPS)
set osd_vbat_pos = 2529set osd_link_quality_pos = 2337set osd_rssi_dbm_pos = 2305set osd_tim_2_pos = 2625set osd_flymode_pos = 3670set osd_throttle_pos = 3606set osd_current_pos = 3636set osd_mah_drawn_pos = 2561set osd_craft_name_pos = 2049set osd_pilot_name_pos = 2081set osd_gps_speed_pos = 3382set osd_gps_lon_pos = 3119set osd_gps_lat_pos = 3087set osd_gps_sats_pos = 2369set osd_home_dir_pos = 2269set osd_home_dist_pos = 2235set osd_flight_dist_pos = 2593set osd_altitude_pos = 18587set osd_warnings_pos = 14712set osd_avg_cell_voltage_pos = 2587set osd_log_status_pos = 1616set osd_sys_lq_pos = 225set osd_displayport_device = MSPset osd_canvas_width = 60set osd_canvas_height = 22save
HD (with out GPS)

set osd_vbat_pos = 2499 set osd_link_quality_pos = 2237 set osd_rssi_dbm_pos = 2229 set osd_tim_2_pos = 2563 set osd_flymode_pos = 3596 set osd_throttle_pos = 3532 set osd_current_pos = 3563 set osd_mah_drawn_pos = 2531 set osd_craft_name_pos = 2083 set osd_pilot_name_pos = 2115 set osd_warnings_pos = 14677 set osd_avg_cell_voltage_pos = 2520 save
Conclusion
Organising the OSD in Betaflight is easy, however with some customization, you possibly can considerably improve your FPV expertise. Whether or not you’re utilizing the OSD to maintain monitor of your battery life, monitor your flight time, or entry the configuration menu on the fly, it’s a function that each pilot can profit from. Use the steps and instructions on this information to tailor your OSD setup to your particular wants, and luxuriate in a extra immersive FPV flying expertise.
Edit Historical past
- Jul 2017 – Article created
- Apr 2021 – Eliminated data concerning MinimOSD, not relevant; up to date article with the newest data and screenshots
- Aug 2024 – Tutorial up to date and added my OSD setups in CLI instructions